I have spent some time teaching normal non-tech people how to use Algo VPN and other Do-It-Yourself VPN solutions, and there are several issues that we encountered each time. So I wanted to put up a manual that everyone could use and that helps remove those issues. If you still find problems along the way, please let me know.
First, a few words about the solution: Algo is not the easiest way to set up a personal VPN, but I think it is the best. Using Algo VPN alternatives, such as Outline or OpenVPN AS, might be simpler but far from better. I will not discuss the drawbacks here; I will say that I tried them and used them and many more for a while. After that, I have found Algo the best possible solution for my overall setup, which ensures a) top speed, b) native OS support on all clients, c) open design, and d) minimal overall potential for user tracking.
Read this manual carefully before you start. It will save you a lot of pain.
There is one thing you will need before we start. It is an active Amazon account with a payment method linked to it, as we will use Amazon LightSail as a cloud engine for the virtual hosts we create. LightSail provides the first month of free usage, but you will still need a credit card to activate the service.
Step 0. Create a deployment user account in IAM
First, let’s create a user account that we will need during the installation. We will create it in Amazon IAM, assign a policy to it, and then input its access keys to Algo when asked.
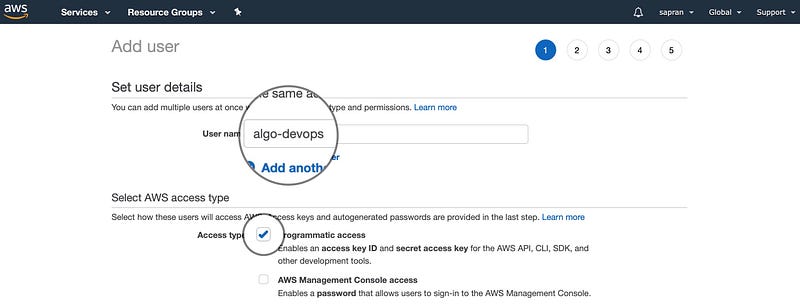
Go to IAM users configuration console to create a new user: https://console.aws.amazon.com/iam/home#/users$new?step=details. Give the user a unique name and mark its access type as programmatic.
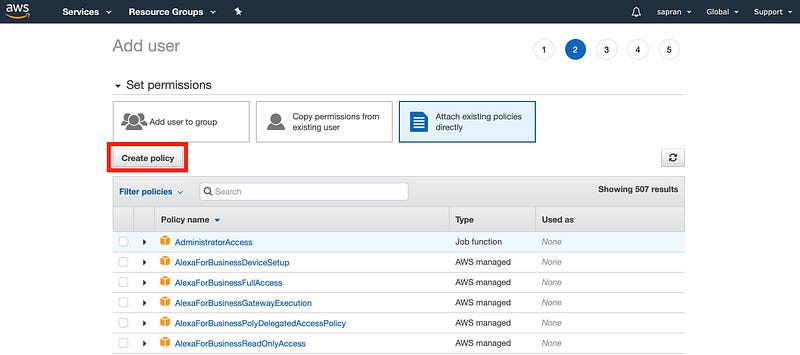
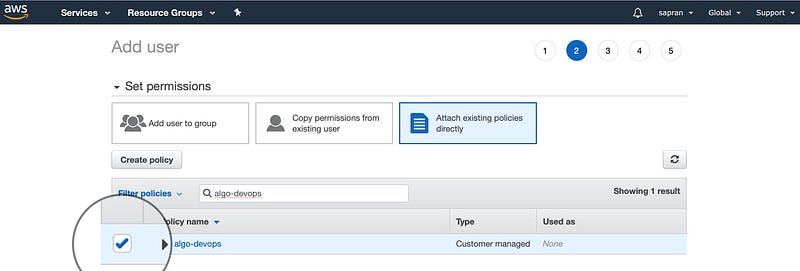
Next step, select “Attach existing policies directly” and then press the “Create policy” button.
A new browser tab will open for policy creation. Edit the policy using JSON mode.
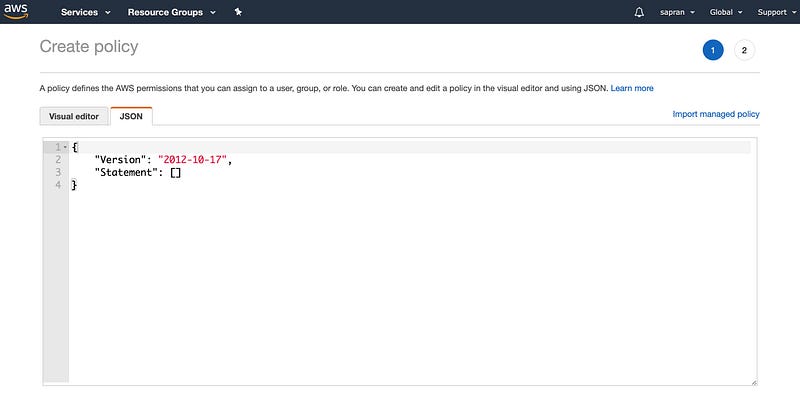
Copy and paste the JSON content below to the policy editor. You can find the original policy in Algo documentation: https://github.com/trailofbits/algo/blob/master/docs/deploy-from-ansible.md#lightsail.
{
    "Version": "2012-10-17",
    "Statement": [
        {
            "Sid": "LightsailDeployment",
            "Effect": "Allow",
            "Action": [
                "lightsail:GetRegions",
                "lightsail:GetInstance",
                "lightsail:CreateInstances",
                "lightsail:OpenInstancePublicPorts"
            ],
            "Resource": [
                "*"
            ]
        }
    ]
}
When the JSON content is there, preview the policy.

Give it a name and then hit “Create”.

Go back to the IAM session and hit the refresh button to see your newly created policy in the list.
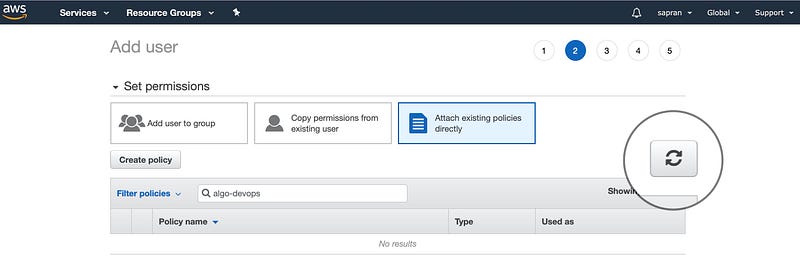
Select the new policy by checking the box next to it and proceed.
Skip the next step — don’t assign any tags — and go straight to Review your new user. After reviewing, hit “Create user.”
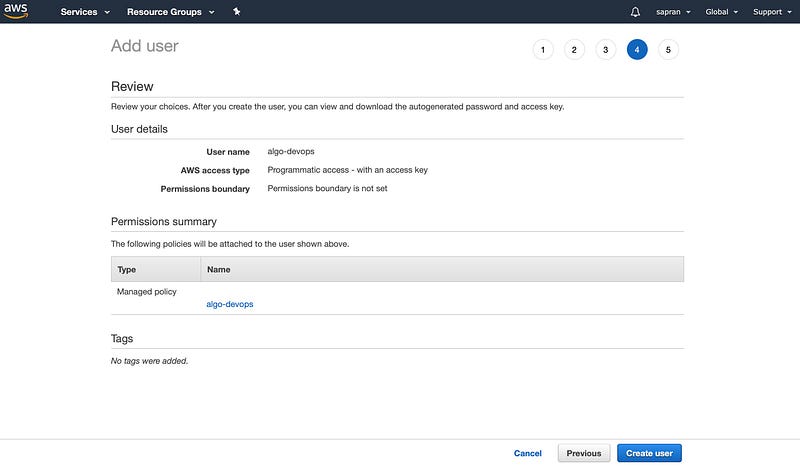
If everything went well, you would see your new user and its access key parameters.

Copy these parameters somewhere safe and keep them until Algo asks you for them.
Step 1. Create a jump host
Now, let’s create a temporary jump host that we will use to run Algo. Running Algo could be hard if you are not running Linux or macOS on your desktop, so I found it more convenient to create a jump host for that. If you already have a Linux machine, you can skip this step.
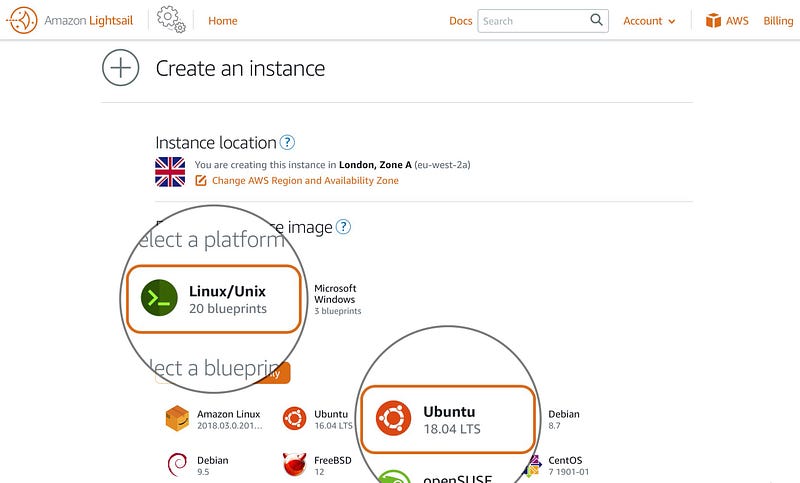
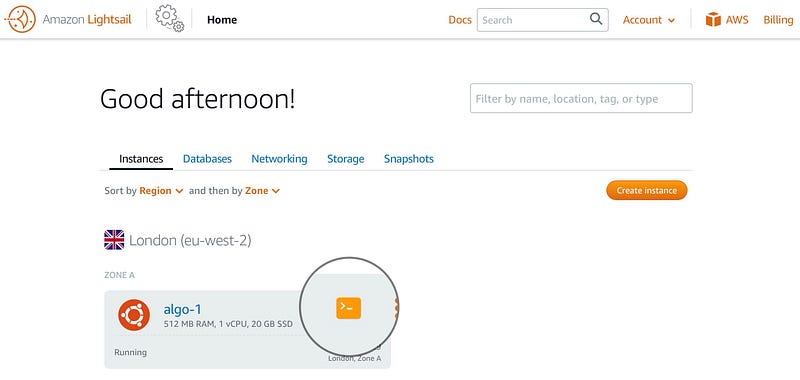
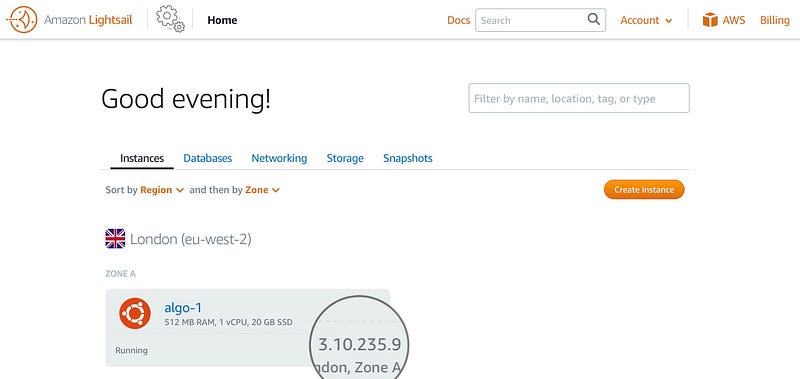
Login to Amazon and go to https://lightsail.aws.amazon.com/ls/webapp/home/instances. There, manually create a new Ubuntu virtual host in any region.

Make sure you create an “OS only” Linux host running Ubuntu 18.04 LTS.
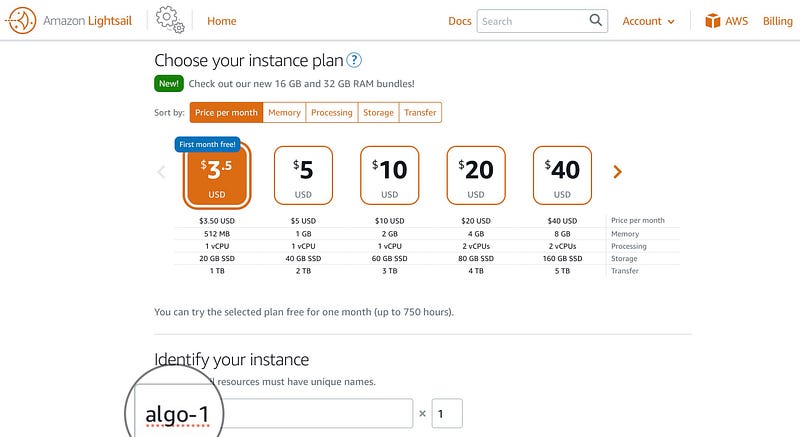
The most economical plan should be fine. Give the instance a unique name.
After the instance has been deployed, hit the terminal button. It will open an SSH session window.

Step 2. Install and configure Algo VPN
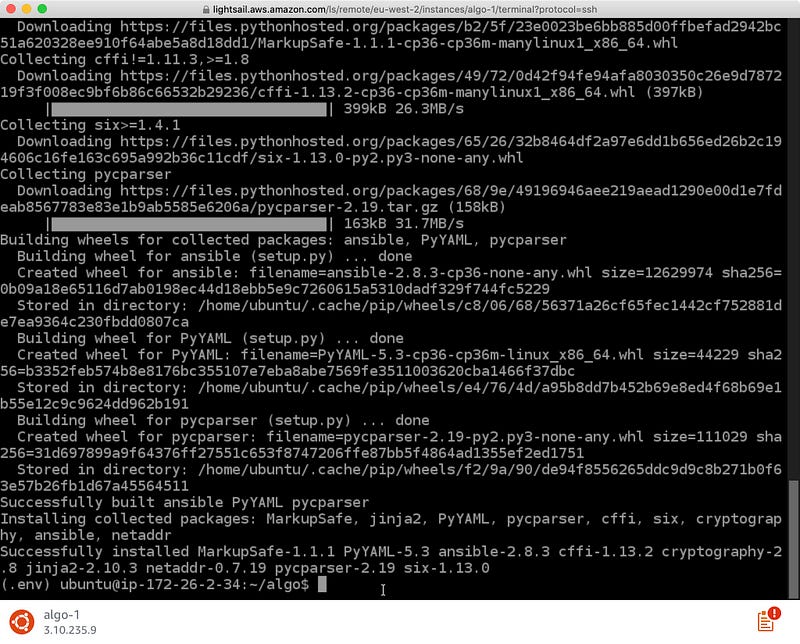
In the console window, run the following commands. You can copy and paste them to the terminal. When asked, “Restart services during package upgrades without asking?” answer “Yes.”
git clone https://github.com/trailofbits/algo
sudo apt update
sudo apt install -y python3-virtualenv
cd algo
python3 -m virtualenv — python=”$(command -v python3)” .env &&
  source .env/bin/activate &&
  python3 -m pip install -U pip virtualenv &&
  python3 -m pip install -r requirements.txt
If you did everything correctly, you will see something like this in the end.
Next, you will need to edit the config file with nano or any other console-based text editor. If you are new to nano and the Linux command line, make a copy of the config file before editing it.
cp config.cfg config.bak
nano config.cfg
Once the editor is open, go to the “users” section and change it to reflect your user plan. Make sure there is a line for every device you are planning to put through the VPN server. It is important to note that adding as many users as there will be people using VPN is not enough. In this case, they might experience networking problems while simultaneously using VPN on different devices.
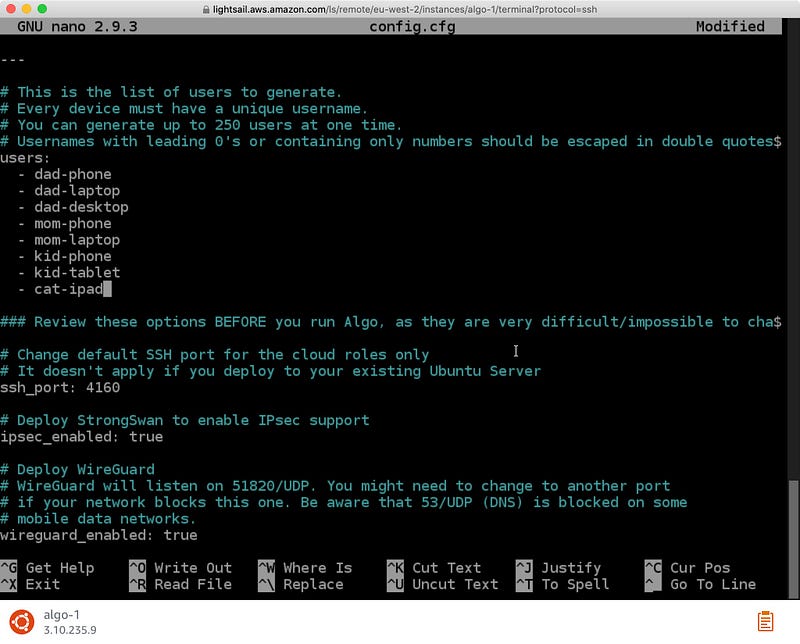
After you have finished editing the file, exit and save by pressing Ctrl+X, choosing “Yes,” and pressing Enter.
Step 3. Run Algo to deploy your VPN server
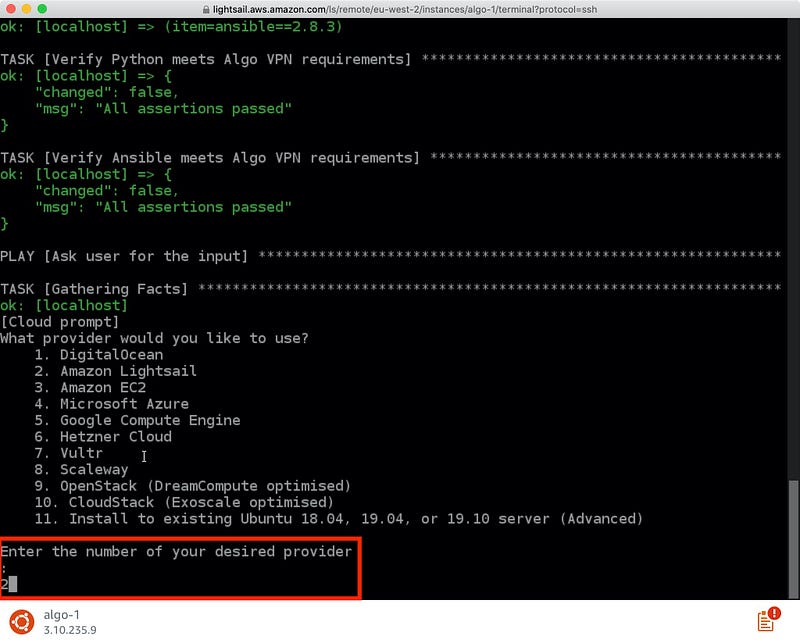
Now, run the Algo script and follow the instructions below to set up the VPN service correctly. If you make mistakes, don’t worry: you can abort the script by pressing Ctrl+C, typing “A,” and restart it anytime.
./algo
The first thing Algo will ask you is the cloud provider to use. We will stay with Amazon LightSail for the sake of this manual.
Next, give your VPN server a unique name.

When asked “Do you want macOS/iOS IPsec clients to enable “Connect On Demand” when connected to cellular networks?” and “Do you want macOS/iOS IPsec clients to enable “Connect On Demand” when connected to Wi-Fi?” answer “Yes”: type “y” and press Enter. This will allow you to configure your clients to route all traffic through the VPN server at all times.
When asked, “List the names of any trusted Wi-Fi networks where macOS/iOS IPsec clients should not use “Connect On Demand,” don’t answer anything. You will be able to configure it later at the client-side if required.
When asked “Do you want to retain the keys (PKI)?” your answer will depend on whether you have plans to add more VPN users in the future. In this manual, we will answer “Yes” and demonstrate how to retain the PKI keys and Algo configurations for future use. But it is important to understand that if someone gets ahold of your PKI keys, they would be able to fully compromise your VPN server and all your network communications through it as a result.
When asked “Do you want to enable DNS ad blocking on this VPN server?” I recommend answering “Yes.” We are going to change this configuration later manually. If you are lazy, it will allow you to skip that part and fall back to the Algo default adblocking mechanism. However, it is worth noting that in this case allowing access to particular resources you would like to whitelist will be much more complicated, and we are not going to cover it in this manual.
When asked “Do you want each user to have their own account for SSH tunneling?” answer “No.” If you have reasons to do otherwise, you probably do not really need this manual.
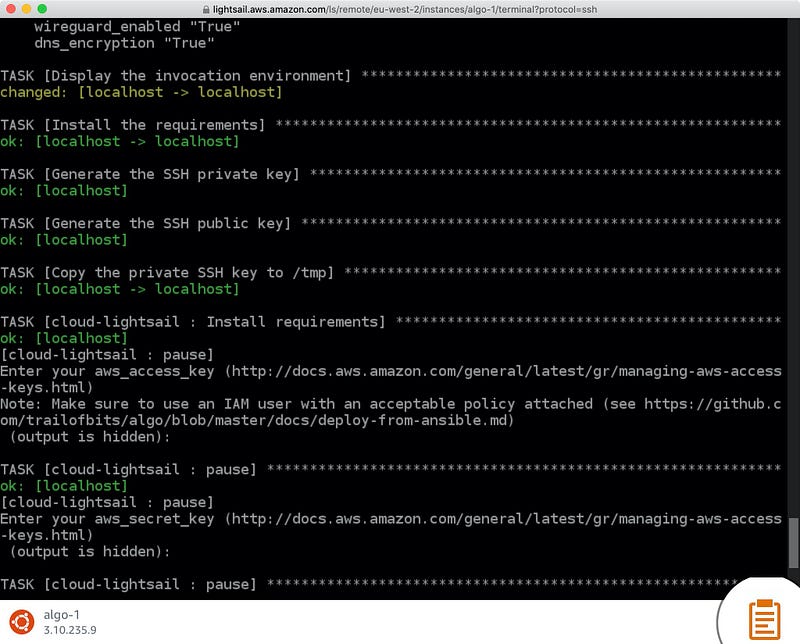
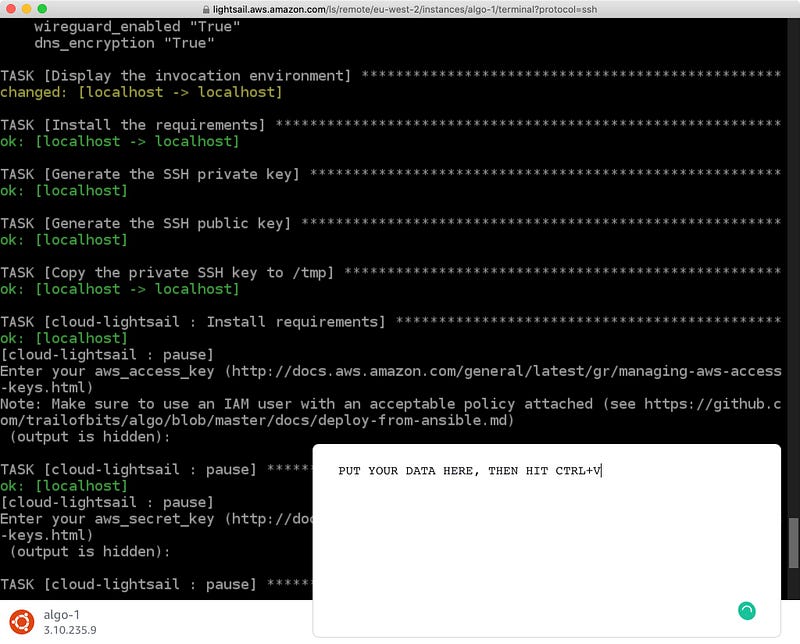
Now, you will have to use the access key credentials of the technical user we have previously created in IAM. Copy “Access key ID” and paste it to the Algo input in your jump host SSH window as “aws_access_key.” Then, copy the “Secret access key” and paste it to Algo as “aws_secret_key” at the next step. To ensure your content is pasted correctly, use the built-in clipboard editor instead of just pasting the data into the window.
Once the keys are inserted correctly, Algo will proceed to region selection.
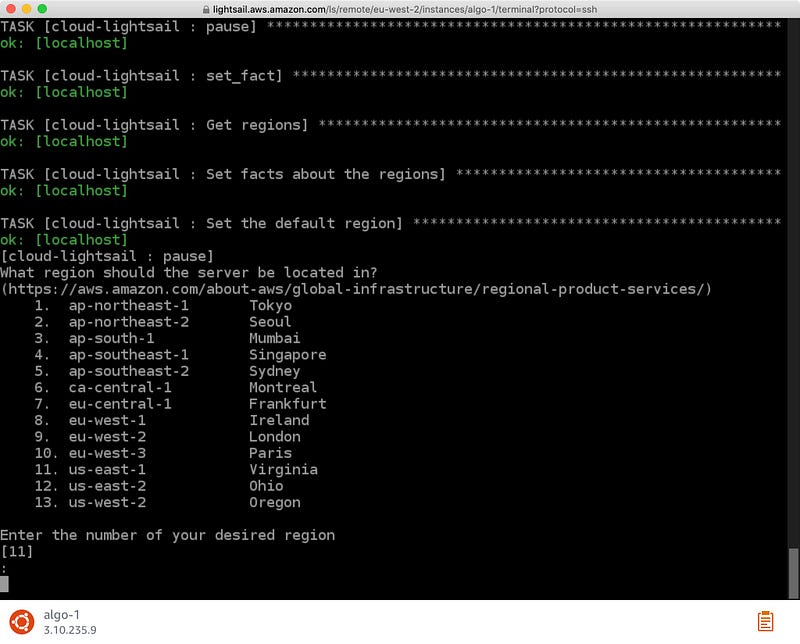
You can choose a region of your liking based on your preference of jurisdiction and privacy regime. Also, keep in mind that it will affect the websites’ behavior (e.g., default language) as you will be seen as a resident of the selected region. For instance, if you speak French, I assume Paris is the location of your choice.
If everything went well, there would be no more questions, and Algo will start deploying your new VPN server. At this point, you clearly understand why I have recommended you to read through the manual and collect the keys before you run Algo. You have probably disconnected a few times from your jump host console and had to start the process from scratch. So, while you are waiting for Algo to complete, make sure you generate some action in the console window — just press Enter once in a while to prevent disconnection.
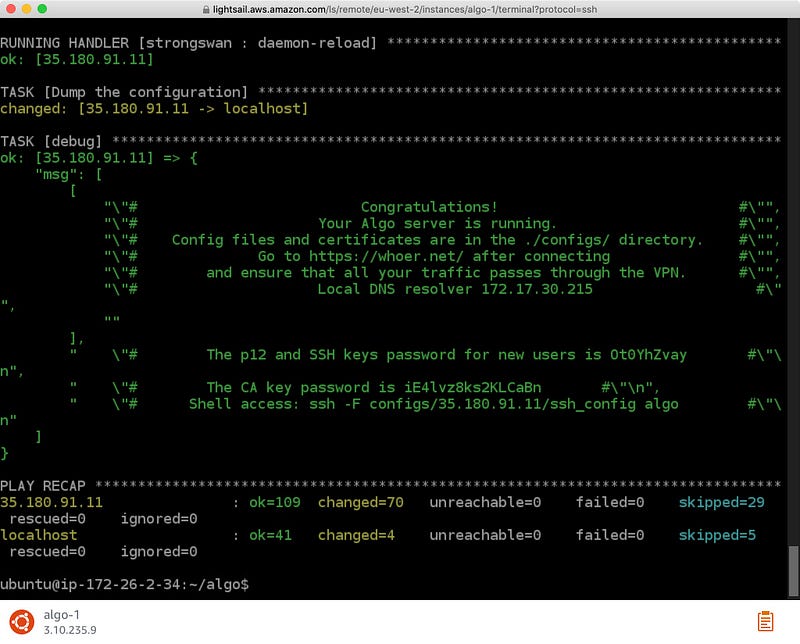
Once the Algo script is complete, you will see the following picture. Copy the full text of the congratulations message and put it somewhere safe. The last 3 lines are the most important.
Step 4. Download your VPN configurations
Next, zip and download the Algo directory. Run the following commands in the console.
cd ..
sudo apt -y install zip
zip -e -x “algo/.env/*” -r algo.zip algo/
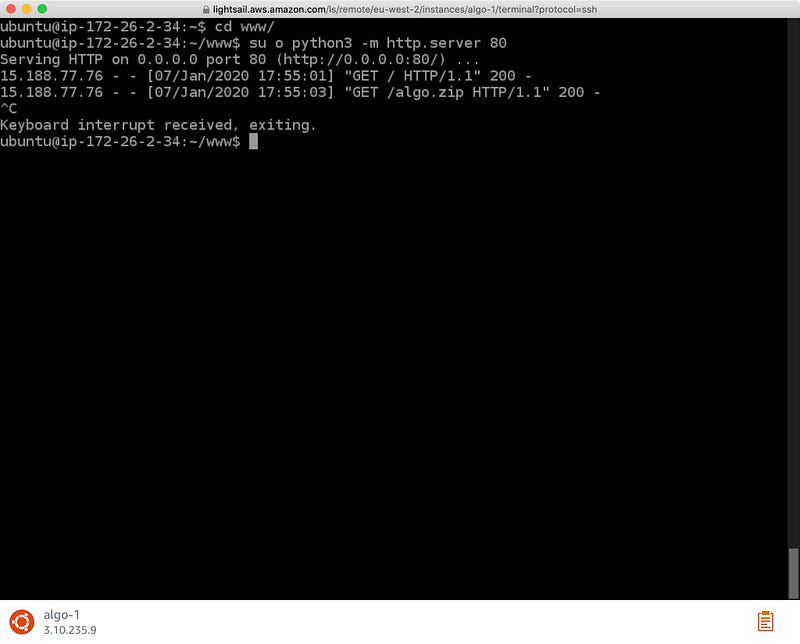
Zip utility will ask you for a password. Select a strong one. Then, create a new directory “www,” move the zip file there, enter it, and fire up a simple web server.
mkdir www
mv algo.zip www/
cd www
sudo python3 -m http.server 80
Now, open the public IP address of your jump host in a new browser window. You can find the IP in the LightSail console.
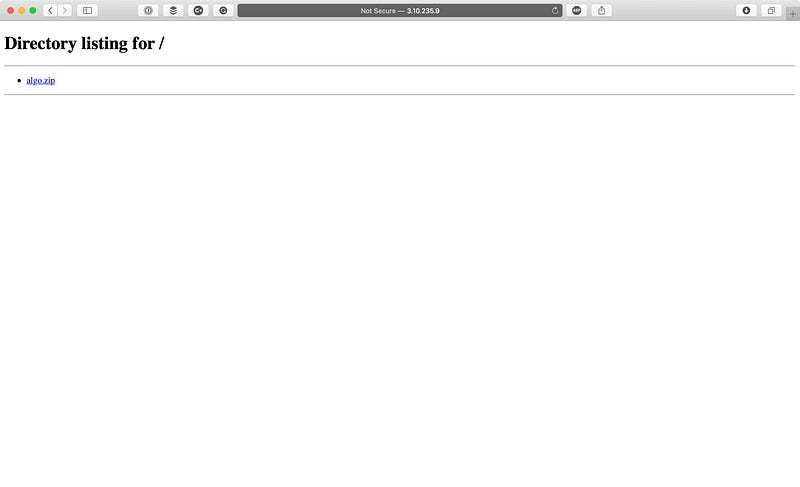
Just download the archive to your local disk and unzip it. Make sure you stop the webserver after that.
Check if all the config files are present in the archive.
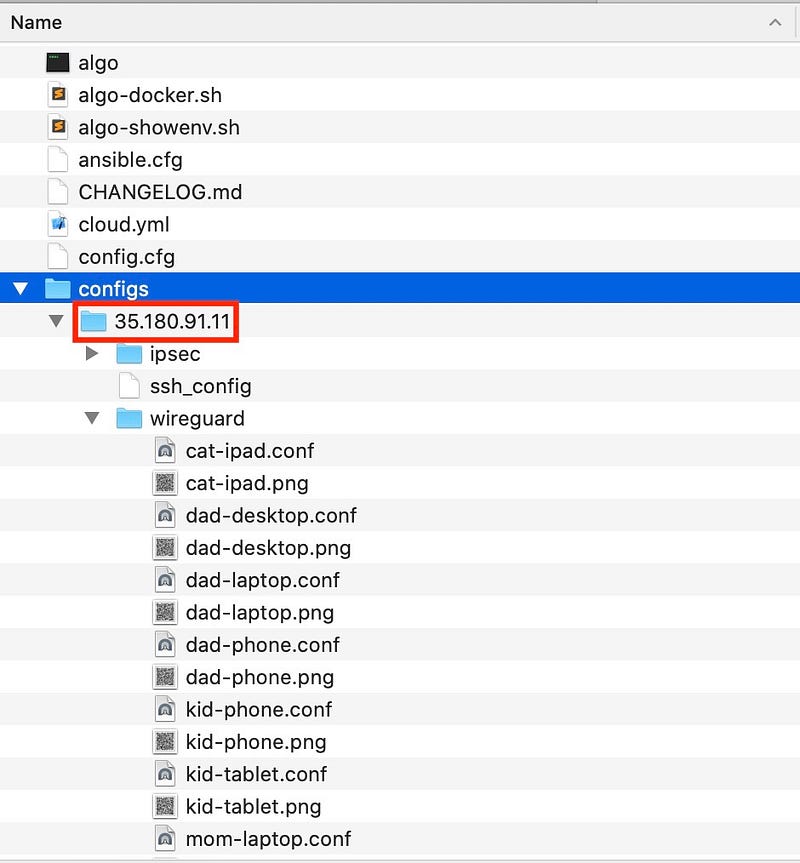
If you see the directory named by IP address and a bunch of config files in it, this means that everything went well, and you can shut down or kill your jump host now. In the LightSail console, you should see the newly created VPN server with the name you gave it during the Algo execution and the IP address the same as in the “configs” subdirectory name.
You can start using your VPN by configuring the client devices. I recommend using native WireGuard software wherever possible. Otherwise, use IPSec/IKE2.
Next, I will show you how to configure DNS-based anti-tracking mechanisms in your new VPN service. For now, play around with it and tell me if you had any trouble configuring it.